Hey all, welcome back to the blog. In my last post, I discussed the basics of the Advance Map hacking tool and the set-up involved for it. I also showed off a small bit of a tutorial for actually editing in-game maps ourselves, starting with the player character's rival's house. However, actually editing the appearance of the map is but a small part of the entire process. As I mentioned in the previous post, there is still a decent amount of work to be done after editing the onscreen map.
 |
| The unedited Movement Permissions tab on Pallet Town |
If you recall from my last post, although the house was successfully edited in terms of actual appearance, we still have to configure how the player will interact with the map. From the above screenshot, we can see there's a lot going on here, so let's unpack what is currently on screen:
- Each individual tile has its own set movement permission, which is represented by a letter or a number. In the case of Pallet Town, these are 1, 4, and C.
- 1 indicates tiles that the player cannot move on. Your character won't be able to just walk over mailboxes and houses, so the 1 marker indicates an illegal space.
- 4 represents tiles that can only be accessed if the player is using Surf, a Hidden Machine skill the player's Pokemon can learn. As such, only water tiles should be marked with 4.
- C marks every tile that the player can in fact walk across. Effectively, this includes everything that makes sense to walk on in normal life, like dirt, grass, and pathways.
These are just a few of the various permission tiles available to choose from. There is an incredible amount to go over, and the vast majority of them are rarely used. But, for now, lets focus on Pallet Town. We need to update the movement permissions on the house we just edited. The mouse controls are exactly like in the previous tutorial, right click a C tile and just fill in the empty space we have left over.
 |
| Simple, right? |
With that out of the way, let us move on to the Events tab. This designates the interactable tiles on our map, including doors to new areas, signs and Non-Player-Characters (NPCs) with textboxes to display, and more. There are five types of map events:
- Person event; as the name implies, these are the NPCs that populate the world we can interact with. In addition to the sprite and position to display for these NPCs, we can also edit their movement script when idle. Does your NPC walk around aimlessly, jog in a circle, or simply look in a specific direction?
- Signpost events are simply signposts that display a textbox when read by the player character.
- Warps represent any doorways or teleporters that "warp" the player character to another spot across the game world. For Pallet Town, these exist via the doors to the various houses.
- Scripts are entirely custom. These are where your miscellaneous tiles fall under. You can use these for something like an NPC preventing the player from moving forward a certain direction.
- Flying Position is where the player will land after using the Fly skill for that map.
 |
| Each Event type is labelled by the first letter of its name |
Up next we have Wild Pokemon, which...does not apply to this area at all. Wild Pokemon typically do not appear in towns unless we wanted to add an area for them. However, I do not recommend this for the starting area because, again, encountering a wild Pokemon before you obtain your starter Pokemon will upset the game. So for this tab, let's quickly look at Route 1, an area filled with Wild Pokemon that is just to the north of Pallet Town.
 |
| For Pallet Town, this list will (and should remain) empty |
As you can see, we can set up the amount of Pokemon that appear in this area, the minimum and maximum level they appear at, and the exact Pokemon themselves. We can also decide on the Encounter ratio, which impacts how often a Pokemon is ran into. We can also determine whether the Pokemon are encountered via walking in tall grass, Surfing, using a Fishing Rod, or the player interacting with a tree. This list can be saved and expanded to include more Pokemon.
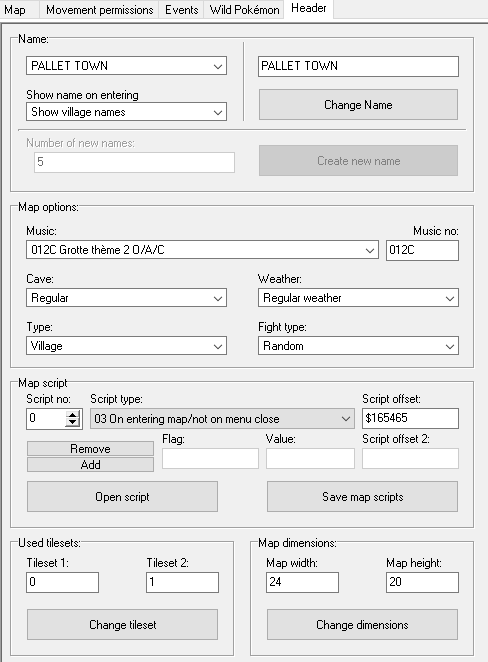
Finally, we have the Header tab, which offers various information about the map itself.
 |
| Note: For some reason, all my music options were not written in English. |
We can completely change the town's name, select the music that plays while in the town, various "themes" for the map (a Village type looks normal, but a Cave type will look much darker, for example), and various other scripting goodies.
However, since we haven't gotten to scripting yet, we cannot play around with any scripting segments of mapping very in-depth for now. Again, let me know what you think so far in the comments, and I'll see you next week!


Can you condense the list of wild pokemon on route 1 to 2 pokemon by setting the min level to 2 and the max to 5?
ReplyDeleteThe min/max level represents the minimum and maximum level that Pokemon will spawn at. Each route has 12 Pokemon slots at max. Its organized oddly here so there's duplicates of Pokemon at a set level.
Delete